Hi

Hi, Thanks for dropping by.

My name is Eileen but to friends in the card making world I'm known as 'ikki'. (which is pronounced I-KEY) From where or how this came about I'm not sure - it just got shorten from my original craft name of Ikemo by various friends along my crafting way! I started crafting whilst recouperating from an accident, and from my first attempts with peeloffs and paint - I was hooked! Now my passion is my BUG! and now BEADING!

In the Cupboard you will find ideas, news, tips and techniques to help you get more from this fab little machine. So come in - join the fun and Cuttle with me!


Sunday 30 May 2010

Nestabilities - use the small dies

Hi, it's sunny again - perhaps summer has returned!  I have today managed to finish planting up my tubs and hangind baskets now they need a bit of warmer to bring them on, and in the meantime I'm back crafting.

I sat on the sofa last night and coloured!  I had a new stamp from Elusive Images and although Glenda had supplied a coloured image for guidance, I found it a challenge with my Promarkers.  After three attempts I was pleased with the colours and the shading of the leaves.  On I went this morning to triple embossing - but the card was too thin and the result was poor in places.  I liked the image so much that I wondered if I could salvage it in some way.  The answer was YES!

I stamped the image straight onto the front of the card and edged the centre fold with three lines.
 A few of the leaves I watercoloured....

then added my cut down embossed image and a sentiment cut
 with the smallest circle die.
So from disaster came a card that I had no idea that I was making!
Now I know why I don't like throwing things away!!


Thursday 27 May 2010

Provocraft - Cuttlebug Vintage Corners on Tippy Thursday

A couple of days ago I posted a picture on what I had done with one of the dies from the Vintage Corner set.  I had a reply from Nessie saying she also had this set of dies and I like me had used the corners but wondered what to do with this one.....
In the end she cut it in half to use as a corner, so.....

this is what you will get.  Nice one Nessie!

this is a stamp from Elusive Images that I have been playing with.  It lacked something?!?!?

So instead of cutting the die in 2, I cut it into 4 and left and bits in!
I like it now - the corners finish the picture nicely and
if you use DST (double sided tape) on the back of the card - they are easy to attach.
The Sandwich for Provocraft dies that will help stop your plates from bending is:
  A /B / die cut face up / card / B
Whilst editing my picture I thought I've have a play with the hue control.   What do you think of this?

 
I have a tendency to dither over what colours to use on an image......I think this could be  a good way of "making my mind up" for the next time I use this beautiful stamp.  Have you tried this?
Have a great day!


Wednesday 26 May 2010

WOYWW

Good morning WOYWWer's.  Week 51 and countdown to WOYWWAC! 

My desk is boring this morning - I have just finished a project which I will reveal later, and it tidy.  so since a number of you have commented on my eating habits, ie CRISPS.....

NO, it's just a pencil case.....

with a message for those on a diet

but now I use it for my  tools.

When I was a WW leader I used it as a prompt by my scales, so for those of you (like me at the moment) on a diet who like crisps - the message is there!  Yes, you can have IF YOU COUNT THE POINTS!! 

Have a great day visiting your fellow WOYWWers.

Tuesday 25 May 2010

Cuttlebug - Vintage Corners

Goodness - the weather folks got it right, there is a change in the weather today!  Here in North Staffs it's chilly and windy too,  just the day to have the porch door adjusted.  Hope it's not a big job!

I have been thinking !?!?!??!(sometimes I do this more than actually doing anything!)  My thoughts were "what have I got that I have not or hardly used?"   In my stash of dies I have this....

die from Provocraft    -  CB Vintage Corners set.
I have used two of the corners many times and good they are too, but this one - never...... 


but now I have!

After cutting the die with the sandwich   A / B / Card / Die cut side down / B  (Don't use the C plate - it will break).  I coloured the white card with three distress inks and then embossed with extra thick embossing powder.  I've found that if you use this thicker powder you get a better result  if you emboss from underneath - not soooo much flies round the room!

I'm really pleased with my enamel looking embellishment    -    now all I need to do is think again on how to use it!  Watch this space.....

Monday 24 May 2010

Make Nestabilitie Squares into Rectangles

How many times do you have a stamp that doesn't fit any of your Nestie dies?  I have a stamp that needs a rectangle mat, but no rectangle dies!  Well some dies can be changed - you can make your squares into rectangles.....

so, taking a piece of card with a straight edge.......

position your stamp and mark  with a pencil

position your square die and tape into position

your rectangle mat......
with a stamp positioner you can now use your stamp and be sure of getting it straight!
This stamp is a Charles Rennie Mackintosh design, which is difficult to colour unless you emboss it first.  This done, with the left over bit of card as a stencil  (as shown) and a make-up sponge and ink (or chalk) you can create  a straight line round the edge of your mat. 
I picked up this tip from Barbara Grey on one of her C&C shows.  Thanks Barbara, it's easy and works well - a good tip worth trying!

Things were going swimmingly up to this point....but.....then....disaster....

Being a meanie type of crafter, when my first stamped image had not embossed equally and not wanting to start again, I had stamped and embossed on the other side of the card, and...drat...it showed through the triple embossing, which also went pear-shaped because I'd somehow got some black bits in the powder!?!?!  So now I do have to start again, but  thought I'd show you this to make you smile, even laugh out loud - the principle works but on this occasion I didn't.  Oh, well - back to the cupboard! 

Saturday 22 May 2010

Nestabilities - Cut, emboss and stencil

Hi, how's this weather suiting you?  We have gone from one extreme to another this week - all I can say to phew!!!!  I was going to finish potting up my tubs and baskets, but it's so hot out there that I've retreated to the cool of my craftroom - any excuse!

What do you think of this idea - stencilling your die cuts.  The packet label tells us Nestabilities cut, emboss and stencil - but have you done it?
After stamping the image  I used the Labels 4 die to cut, and  then with the tan mat (or embossing pen) embossed the edge.   Leaving the die cut in the die, I coloured the background with  inks (or chalk) - I used the distress ink Scattered Straw and coloured with Promarkers.  
remove the die and you have a mock layered look. 


Add a bit of cuttling and a few beads and wire curl - a quick but great card suitable to any occasion with a change of sentiment.  I made this for a male friend's birthday, but you could also use it on a thinking of you, get well or sympathy card.  The stamp by Elusive Images is from the Eastern Grasses set.

I wasn't until I'd finished the card that I decided to share this with you, or the photos would have been slightly different, but I think you will see clearly the effect you get.

Thursday 20 May 2010

Spellbinders Pendant Dies - Tippy Thursday

I received a query recently from Gloria who was having problems removing the cut die from one of the Spellbinder pendant dies. 

This is a problem that many are finding because the more intricate the die cut, the more difficult they are to remove from the die!  I have covered this problem before, so for Gloria and others who may have miss this tip check it out here.  

Thanks to all who gave their views on the B Plate post last week.  It seems that we have discovered various ways to adapt sandwiches so your comments to the post will help and assure anyone having problems or doubts!   I have added to my post that your comments make interesting reading. 

Thanks for dropping by.

Wednesday 19 May 2010

WOYWW

Hi WOYWWers, hope you've all had a good week.

I've been busy doing something......
Then I started looking for something and now I can't find anything.....
the Tardis has exploded!

See you over at WOYWW.

PS: If you donated cards to my Breast Cancer Appeal - please read the post below. 

Tuesday 18 May 2010

Thoughts on Tuesday

My thoughts today turn to you - my blogging friends!  Last November after an ordeal over Breast Screening  I realised how many women are affected by Breast Cancer.  I was lucky and discharged after further tests, but I was so impressed by the service and thoughtfulness of the North Staffs Screening Unit that I decided to appeal to my crafting friends to donate a card to the Unit.  You, my friends responded magnificently I have to tell you that I'm now able to send them a cheque....

for £400. 
I have been overwhelmed with your generousity and support and on behalf of the unit and myself, say a very big "thank you" for your donations and for caring enough for your fellow women to take the time  to help this worthy cause.

If you would like to help further, I have add a "click every day" logo for free breast screening to my sidebar.  This link will take you the the Breast Care site where you can support their work by "just a click"!

Thanks again,

Monday 17 May 2010

Cuttlebug - Embossing borders

On my card today I have used a full 6 x 4 folder to create borders.  Not all folder patterns will allow you to get away with this, so when you buy new folders it worth looking at the design to see if you can top and tail it!  With designs that cannot be turned (even I don't want upside down birds and things) there is also the option of splitting the folder and rejoining again with tape on whichever edge you want.  This may seem drastic, but it does work and makes your folders more versatile.  You can also do this with the small 2" x 2" folders making it possible to emboss in the middle of the card!  If you are interested in this technique - check out my posts on Love and Marriage on the sidebar.

Using Momento ink and Promarkers, I stamped and coloured the image, then trimmed round the design and triple embossed.  It looked lost just mounted on the card and just needed a touch of something?!?!?!   Hence the border pattern, which I think works well adding texture and interest but not detracting from actual  image.

 Thanks for visiting, hope you find this useful.

Friday 14 May 2010

Friday's Followers Gallery

Good morning, today is Friday and it's Follower's Gallery time!

The card going into the gallery today is another beauty!  Although Eileen says I'm to blame for her spending lots on money on folders and dies, I have to say that her spends have been well worthwhile if this is an example of her crafting!  So I won't say anything, but WELL DONE!


The Sylized Flower folder has always been a favourite of mine and embosses really well on white cardstock.  It can be coloured with chalk or glitter, but for me plain is classic elegance and with the colours from the Big and Juice Ink Pad range that Eileen has used on the flower and butterfly dies - stunning result!  Pop over and see details of how she achieved this, you will not be disappointed.
Thanks Eileen for your supporting the Cupboard and for sharing your work with us. 

Thursday 13 May 2010

Tippy Thursday

Thanks to all who left comments last week on how you use your B plates.  If you were interested in this post, you will  find it useful to have a look at these. 

I would again add that if you are using CB dies you need to change your sandwich because of the thickness of the dies. 
Sandwich:  A  /B / Die Cut face down /card / B     or      A / B / card / Die face up / B

Chrissie has left a very informative comment on using Alphabet dies.

Cardstock

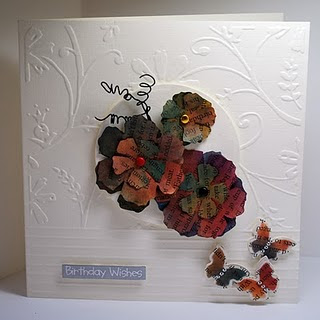
We all use card - I like to use textured cardstock and buy A4 sheets.  You can get various textures:  Linen, Leather, Hammer which is usually a heavyweight which gives a quality feel to your finished card.  If you are going to the trouble of making a card, you want it to stand up!

I usually emboss straight onto the card, but unfortuntately most of the embossing folders do not fit our size of  6" x 4" card fully.  To overcome this I complete the design with one or two straight lines top or bottom, or both.  This is also a useful way of finishing off a part-embossed panel.

I only know of two companies that supply folders slightly bigger than the Cuttlebug  :  Crafts to you and Sizzix.  From my experience the Sizzix folders do emboss a very heavy pattern so you do need a heavyweight cardstock, even then I find that the card fibres do creak and spoil the appearence of the embossing.  To overcome this, place a thin piece of copypaper on top of the card.  You could  find that with using heavyweight card and copypaper that the sandwich is too thick and will not go through your Bug.  If this is the case, remember that you do not have to fold your card round the folder!  You will also find that if you only place the front of your card inside the folder you can emboss right up the the centre fold.

The news on Cuttlebug Embossing Folders is that new folders will be available late May/June - check out the Provocraft site.   You can also check out the Sizzix designs on their web site.

Have a great cuttling day. 


PS: Betty informs me that Wizard suggest spraying a fine water mist on your card to on stop breaking the fibres.  Worth a try!
Thanks Betty.

Rita (Munkeezmama):  Thanks for your question - I cannot contact you direct so will post here.  The cardstock you refer to is called Textured Leather effect.  I get this from my local craft market stall, but have check the net and you can get it from other craft supplier.  Hope this helps.

Wednesday 12 May 2010

WOYWW

Hi there friends at WOYWW - are you looking forward to a busy day blogging?  I'm posting piccies, but then I have to go out - so see you later.

Last night I sat on the sofa and sorted out my ribbon boxes.

When done I just dumped them on my little tardis desk to show you one of my secret stores.

I colour code them and store in self seal bags, which would work if I always replaced the left over bits and sealed the bag! Hence the need to sort, again!!   

Then with the lids on the boxes they just sit by the side of the tardis - handy but out of sight.  Here you can also see my tray and small glass cutting mat which I use when sofa crafting. 

I'm going to keep my WOYWW post small and concise in future - just a quick look and read to keep in touch, gain friends and ideas, or I feel that we'll  lose the concept of  this great idea of Julia's!   I want to visit as many desks as possible and leave comments which I'm sure you do too, but if we stray away from a sight of our Wednesday morning desks we will have lost it! 

Tuesday 11 May 2010

Tuesday Thoughts - How do you make the same stamp from Elusive Images look different?

I have praised before stamps from Elusive Images I love them!  A lot!! but how do you make silhouette stamps look different?  After all if you want to get good value from your buy, you need to do this!

My first card: Using a stamp from the Eastern Grasses plate coloured with DI's and then embossed once to give a pitted glossy finish.
 
When mounted on white hammer card with a wire and bead curl and embossed sentiment.....   
I have a plain, simple style, but classic card - always a favour of mine!    BUT, as you know I always post cards in the Cupboard that have an embossed or die cutting feature so to put this right......

my second card.    I could only achieve a little bit of cuttling here - one of the corners from the Vintage CB die set.  But, what a dramatic statement that little die cut makes!

then with DP from HOTP, cream leather effect card and different coloured inks.
  Quite a different look from the same stamp.

I think my Tuesday thoughts turned out okay thanks to these beautiful stamps and I still have 7 more stamps on the plate to go at! Thanks Glenda I think I made a very good buy, and no postage and sale prices as well until the end of May!  Think you will be busy!!